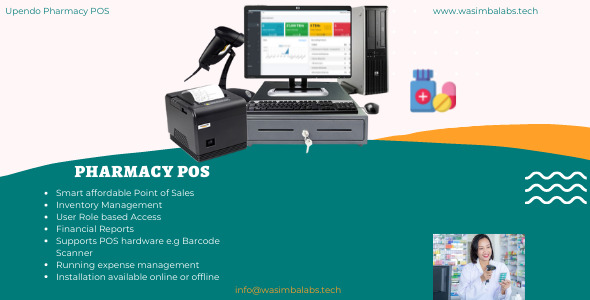
Pharmacy Management System
Description
Pharmacy Management Information System
Pharmacy Management System is the Point of Sales System developed using Flask Python web minimalistic framework for Wholesale and Retail pharmacies . The system supports moderm technologies of POS such as Barcode Reader and Thermal receipt printing”
DEMO Link
System Features
- For Retail or Wholesale Pharmacy
- Supports POS Hardware(Barcode reader(1D and 2D), Receipt Printer)
- User-Role based access control
- Inventory and Stock Management
- Expiring Drugs management
- Records all running expenses and Deposits
- Reports
- Sales Reports
- Purchase orders
- Profit and Loss Report
- Demo is available online
- Can work Both Offline and Online
System Requirements
Upendo PMIS is written in Python using the Flask Minimalistic Web Framework.
Minimum Requirements
- Linux or Windows OS
- Python 2.7+
- Flask 2.0.1
- Gunicorn/ uWSGI or FastSGI
- PostregreSQL
- System works with all uptodate browsers.
After signing in, go to the settings page and change the your default pharmacy settings
Currency Symbol with 3-character code.
- AED: United Arab Emirates Dirham
- AFN: Afghan Afghani
New Roles
Add New Role: To Add New User Navigate to System Roles -> Add Role and And fill out the form in the window that popus up
Add Permissions to Roles
Update Permissions: To Add New User Navigate to System Users -> And fill out the form
New Users
Add New Users: To Add New User Navigate to System Users -> And fill out the form
Note: Take note to select the appropriate user level when creating the different user account i.e Select 1 for Administrator Select 2 for Dispenser Select 3 for Cashier.
5. Order and Payment TypesOrder Types
There Can be Various Order Types
- Invoice—The Pharmacist only places order Only and the cashier accepts and receives money
- Receipt—The Pharmacist Can place order and receive payment and print receipt at the same time
Add New Order Type: To Add New Order Type Navigate to Order Types -> Add Order Type and And fill out the form in the window that popus up
Payments Types
There Can be Various Payment Types
- Cash
- Bank Deposit
- Mobile Money
Add Payment Type: To Add New Payment Type Navigate to Settings->Payment Types -> New Pay Type And fill out the form
6. CustomersNew Customers
Because the Pharmacy can be busy and client can be uncorfortable to be registered, the System needs to have a Default Customer
By Convention : You can add this Customer to have a Name of :
- POS Customer
Add New Customer: To Add New Customer Navigate to Customers -> And fill out the form
Other Parameters like age and contact details are optional
This section is intended to capture any customer information that you might want to remember in the future.
7. Suppliers and Purchase OrdersSuppliers
Now that your system is setup and ready for sales
You need to have Suppliers from which you will purchase Drugs
To Create your suppliers, Navigate to Suppliers -> and fillout the form. To edit or delete suppliers, click the repective buttons and adjust accordingly.
Suppliers are added so as to trace back some medicines that might have problems e.g short expiry from particular suppliers
Purchase Orders
Now Record the Purchase Order from the above recorded Supplier
Every Drug in the system will have a reference to their specific Purchase Order
To Create Purchase OrderNavigate to Dispenser->Purchase Order
Purchase Order Ref can be Invoice No or Receipt No
8. DepositsCreate a Deposit
Deposits are how you keep track the amount of Cash the cashier receives and any money that is taken out of the pharmacy either being banked or taken by the owner, this is where it is recorded. Create a bank account to track where the money is being deposited
9. Drug Categories and Drug ListDrug Categories: The system comes with a medicine categories in excel sheet, that you can edit and Upload.
Before registering a Drug Generic Name, you will need to add drug categories
Medicine List: The system comes with a medicine list in excel sheet, that you can edit and Upload. However the list may not applicable to many countries that is why there is an option to add, delete or edit medicines on to the master list.
10. Add StockBefore Begining Sales, you will need to Add stock to the invenotry Remember, this can only be added after doing a Purchase and Registering the Purchase Order To access the Add Stock Menu, Navigate to Drug Inventory-> Add new Product
Step 1: Toggle the side bar menu on and off to get more working space Step 2: Search the Order Reference number and click on the reference number to populate the Order details Inputs Step 3: Press the + Button on the Bottom Left of the form Step 4: On the Window that Pops Up, Search the Generic Drug Name of the product you want to add, make selection Step 5: Fill the rest to the fields accordingly.You can use the purchase Order Invoice printout to fill the fields. Medicines are entered in their smallest units ie tablets, bottles and NOT packets or boxes. For example if you receive 2 packet of Amoxicillin caps 250mg and each packet with 10 Blister, and each Blister has 10 Capsules, therefor the quantity received is 2 X 10 X 10 = 200. With this in mind, also the prices have to be calculated and input into the system per tablet. or per packet in drugs that are not sold on basis of Tabs e.g Artemether Lumefantrine (IMPORTANT) The Barcode Input is Optional and may be used by using Barcode Reader IMPORTANT Batch No or Lot Number is mandatory because of market fluctuations of Drugs, this feature can be disabled upon request, but will give false estimations of profit in drugs that have price fluctuation on every Purchase
11. Purchase HistoryReview the medicine purchase history where you get to view the Invoice PDF as appears on the Invoice from Supplier
</section> 12. Stock Monitoring1. Stock Levels
Here you will monitor the stock levels of the remaining balances of each item. The window gives you the remaining cumulative total for each item All the items highlighted in orange are the ones below the re-order level. At this point you have a Menu to add New Product
The System Supports Adjust stock levels incase items are damaged, editing price details e.t.c
2. Out of stock:
Click here to view all the items that have run out of stock.
This part of module requires the dispenser to take action, once the item Out of stock has been puchased, the dispenser should take action to remove this item from the list
13. Expiries To top1. Soon Expiring:
Upendo PIMS will give you records of items soon expiring based on Date Range, this will be useful to help you sell medicine before they expire.
2. Expired Medicine:
Upendo PIMS will give you records of items that have expired, this will be useful to help you remove the medicine from the shelf.
Select Dates that are below the current Date to see expired drugs
The Dispenser will have to mark the item as Resolved to indicate item has been removed from the Shelf
14. Point of SaleStep 1: Click POS from the Dispenser menu.
Step 2:Select Order Type as Invoice or Receipt based on your role
Step 3: Search Product by typing first few characters of either the trade or generic name to select the desired product.
You Can also search the item by using Barcode and Barcode Reader
Step 4: Input the quantity you want to sell. NOTE Quantity remaining because inputing a value greater than that will result in the inventory having negatives.
Step 5: This is intended to put a DISCOUNT to the selling price, the discount value is per smallest selling unit i.e per tablet. For example the selling price of paracetamol 500mg is 50, if you need to sell the medicine at 45, input 5 as the discount value.
Step 6: Ensure to Have a Default Customer Name or Register a New customer if he/she wishes so.
Step 8: If the Pharmacy has A cashier then, on Save Payment the client will be redirected to pay at cashier window
Step 9: Incase of Pharmacist acting as a dispenser and Cashier then, Upendo PIMS is cofigured to work with Thermal receipt printers, therefore on successfuly payment the receipt will be printed out a receipt. Consider disabling printer dialog pop up in your browser for quick printing.
<section id=”cashier”> 15. Billing and CashierSome Dispensing Outlets and Pharmacies normally have a cashier, whose role is to accept orders and collect money from clients
Under Cashier Module->Pending Order
<section id=”methods”> 16. ExpendituresTo Add Edit Expenses Navigate to- Expenditures.
Please Note that, the description is intended to give more explanation on the expense that has been incurred.
17. ReportsIn Upendo PIMS All Reports will be generated automatically based on your transactions with the ability to be exported into PDF.
Available Reports:
Sales Reports: Reports for Income with all transaction filtered by the selected date range.
Income Vs Expense Vs Loss from expired/damaged drugs: Automatically generated snapshot of your income & expense, so that you can compare.
18. The EndThank you for purchasing Upendo Pharmacy management Application. I hope you will enjoy using this application. For customisations, contact us at info@wasimbalabs.tech OR njunwawamavoko@gmail.com
Categories
Tags
External listing. code.market does not sell this product and does not process payment for it. Pricing, payment, delivery, licensing, refunds, and support are handled by the third-party merchant on its own website. We may earn an affiliate commission from a referral. Details.
Products of the Week.
Submit#1

wanapi.app
Wan API is a developer platform for the Wan video model family. Compare Wan 3.0, Prime and Pro specifications and prices, then prepare a request in the preview playground.
Other · 8,163 views · 21 clicksOther · Week 42 · 8,163 views · 21 clicks
#2

wanapi.ai
Wan API is a developer platform for the Wan video model family. Compare Wan 3.0, Prime and Pro specifications and prices, then prepare a request in the preview playground.
Other · 7,510 views · 12 clicksOther · Week 42 · 7,510 views · 12 clicks
#3

yee.site
Your link in bio, but a real website. Start from beautiful templates and ready-made sections, then add a shop, bookings, a blog and as many pages as you need. Perfect for your link in bio, portfolio or personal site.
Other · 13,595 views · 22 clicksOther · Week 42 · 13,595 views · 22 clicks
#4

upvote.club
Free Social Media Engagement that Helps Boost Your Content. Upvote Club supports 19 social networks with 100+ engagement actions in one dashboard. Add links to your posts and get free engagement from real users.
SaaS · 34,489 views · 104 clicksSaaS · Week 42 · 34,489 views · 104 clicks
#5

Seenshot App
Free, Fast, MacOS Screenshot app. Make Screenshot cmd+shift+2 and send it via link
Desktop App · 22,981 views · 114 clicksDesktop App · Week 42 · 22,981 views · 114 clicks
#6

Conversational Backlinks for Busy Founders
Place Backlink Relevant Conversation for your domain across Forums and Conversations
Website · 34,755 views · 204 clicksWebsite · Week 42 · 34,755 views · 204 clicks
#7

Substack Posting API
Onboard your Agent to Substack. Write Publish on Substack via API
SaaS · 53,621 views · 190 clicksSaaS · Week 42 · 53,621 views · 190 clicks
#8

codester.com
SocialDesk+: Omnichannel Social Commerce & Business Management Platform This is stronger than simply “Social Commerce and Messaging” because it tells buyers this is a complete business platform, not just a messaging script. Turn Social Conversations Into Sales SocialDesk+ is a complete omnichannel social commerce and business management platform built for businesses that sell and communicate with customers through social media. Instead of switching between WhatsApp, Facebook, Instagram and TikTok, businesses can manage customer conversations, comments, products, leads, follow-ups, automation, teams and business reports from one professional workspace. And because the full source code is included, developers, agencies and entrepreneurs can customize, rebrand and launch SocialDesk+ as their own business solution or SaaS platform. 🚀 Build Your Own Social Commerce Business SocialDesk+ gives you the foundation to launch: - Your own SaaS platform - A white-label social CRM - A social-commerce management system - A customer communication platform - A business messaging solution - A custom solution for clients - A multi-business subscription platform 💬 Connect Your Customers Supported social channels include: WhatsApp • Facebook • Instagram • TikTok Bring supported conversations into one centralized workspace and help businesses respond faster without constantly switching between platforms. 🛍️ More Than a Messaging Platform SocialDesk+ combines communication with the tools businesses need to manage customer opportunities: Inbox Manage customer conversations from connected channels. Comments Monitor and respond to social-media comments. Customers & Leads Organize customer information and potential buyers. Products & Catalog Manage products and give your team quick access to product information. Follow-Ups Make sure potential customers don't get forgotten. Automation Automate repetitive customer questions and responses. AI Assistant Provide AI-assisted communication when configured. Team Management Give managers and staff access to the business workspace. Reports & Analytics Track activity using business reports and analytics. The current product listing already includes these capabilities. 🔥 Why Buyers Will Want It Launch Faster Start with an already-built business platform instead of developing the entire system from zero. Customize Everything The full source code is included, allowing developers to change branding, features, workflows and integrations. Build a SaaS Create multiple business workspaces and offer SocialDesk+ as a subscription-based service. Sell to Businesses Offer it to retailers, restaurants, service businesses, online sellers, agencies and other businesses that communicate with customers through social media. Mobile + Web + Backend This isn't just a mobile UI template. It includes: - Flutter mobile application - Python / FastAPI backend - Web interface - Administration tools - Database infrastructure - API-based architecture - SQLite / PostgreSQL support - Android and iOS project structure 💼 One Platform. Multiple Business Opportunities. For SaaS Entrepreneurs Launch your own subscription platform and allow multiple businesses to operate inside separate workspaces. For Software Agencies Customize and rebrand the platform for clients instead of building an omnichannel business system from scratch. For Developers Use the complete source code as a foundation for your own social-commerce or customer-management product. For Businesses Deploy a dedicated version for your own customer-service and social-commerce operations. 🧩 What's Included Mobile - Flutter / Dart - Android - iOS project Backend - Python - FastAPI - SQLAlchemy - Alembic Database - SQLite - PostgreSQL Web - HTML5 - CSS3 - JavaScript Deployment - Docker - Docker Compose - Production configuration Business Platform - Multi-workspace architecture - Authentication - Teams - Customers - Products - Messaging - Comments - Automation - Reports - Subscriptions - Administration The current listing also documents third-party integrations such as Meta, TikTok, Stripe, Firebase, SMTP and optional OpenAI configuration. ⚡ What Makes SocialDesk+ Different? You're not buying a simple: ❌ Chat UI ❌ WhatsApp clone ❌ Flutter template ❌ Admin dashboard ❌ Basic CRM You're getting a complete business platform foundation that can be customized, branded and commercialized. Connect. Automate. Manage. Grow. SocialDesk+ Omnichannel Social Commerce & Business Management Platform One important change I'd make to the current listing The current page starts with: “A simple guide to managing your social conversations, customers, products and business activity.”
Other · 20,991 views · 35 clicksOther · Week 42 · 20,991 views · 35 clicks
#9

sandbook.app
Sandbook reads EPUB, PDF, web pages and scanned pages aloud with Kokoro TTS, an open neural voice model that runs on your iPhone, free and offline. Choose from 41 natural voices in English, Spanish, French, Italian, Brazilian Portuguese and Hindi and follow each word as it is spoken. Try the same voices in your browser first with the free Kokoro TTS online demo.
Other · 20,899 views · 17 clicksOther · Week 42 · 20,899 views · 17 clicks