Import Entries for Gravity Forms
Description



Import Entries For Gravity Forms Is Now Fully Compatible With Gravity Forms 2.5 Version.
Gravity Forms Import Entries add-on is a Gravity Forms extension that allows you to import hundreds of entries to your Gravity Form effortlessly. Importing your CSV file into Gravity Forms has never been this easy!
The admin can also update existing entries by mapping the fields (from the CSV file) that match the Entry ID – Import new entries and update your old ones within minutes. Import more than just entries
Update version 1.2.2
Import Gravity Form Entries Through CSV Files from Microsoft Excel, Apple Numbers, Google Sheets, or LibreOffice




Import files from different data storing platforms
Easily import files from Microsoft Excel, Apple Numbers, Google Sheets, LibreOffice or another spreadsheet format within minutes. All you have to do is simply export your file to a CSV before importing them in “Gravity Forms Import Entries” add-on. Save time and efforts by exporting your data in a reusable file format.
How to export a CSV file
Add-On Features
- Export entries from the Gravity Form plugin using a CSV file and import it to the Gravity Form Import Entries add-on.
- Manually create a CSV file that matches Gravity Forms criteria.
- Choose to import entries from either Gravity Form or a CSV file.
- Update existing entries by matching the selected fields (from CSV) with the Entry ID.
- Admin will have the option to import post types – The selected post type will be added to the post type list.
- Admin has the option to make Conditional Logic filters – Import entries accordingly and set conditions for the entries that match certain criteria.
- Admin has the option to save form mapping and conditional logic as a reusable template.
- The system filters and extracts the records with errors to a new CSV file, making it easy to rectify those records.
- The admin will have the option to validate rules on Gravity Form. Apply Gravity Form validation when importing entries.
- Get notified via email.
- Choose to allow or restrict any specific field from being imported.
- View the number of imported rows in the uploaded CSV file.
Compatibility With Other Addons
Gravity Form Import Entries is now compatible with the following Gravity Forms Elite Addons:- Gravity Form Signature Addon
- Gravity Form Coupon Addon
- Gravity Form Survey Addon
- Gravity Form Poll addon
- Gravity Forrm Quiz Addon
How-To-Guide
GF Importer: How To Import CSV File
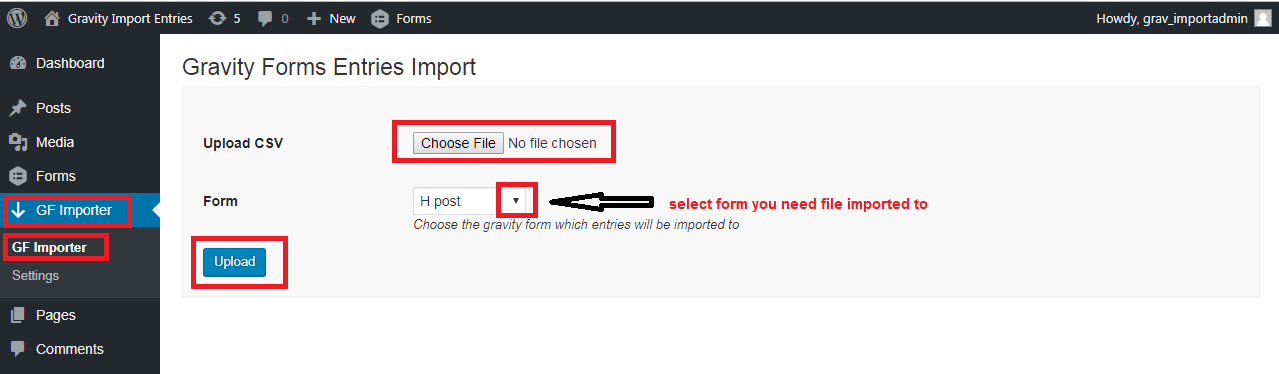
- Step 1: Go to the GF importer tab from the dashboard panel in the main menu.
- Step 2: Click the “Choose File” option to upload a CSV file or export one from Gravity Form.
- Step 3: Select the Gravity Form and click on the upload button.
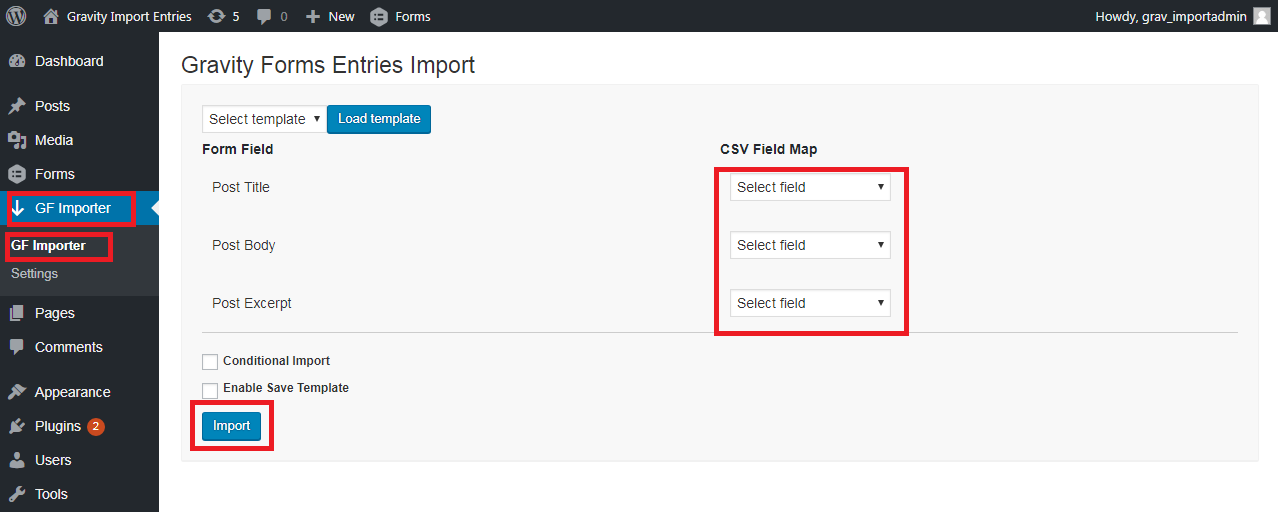
Mapping between fields and CSV file
Admin must make sure to provide enough form fields in the form (as many as in the CSV file), for the Gravity Form importer to extract data from the CSV file to the form fields.
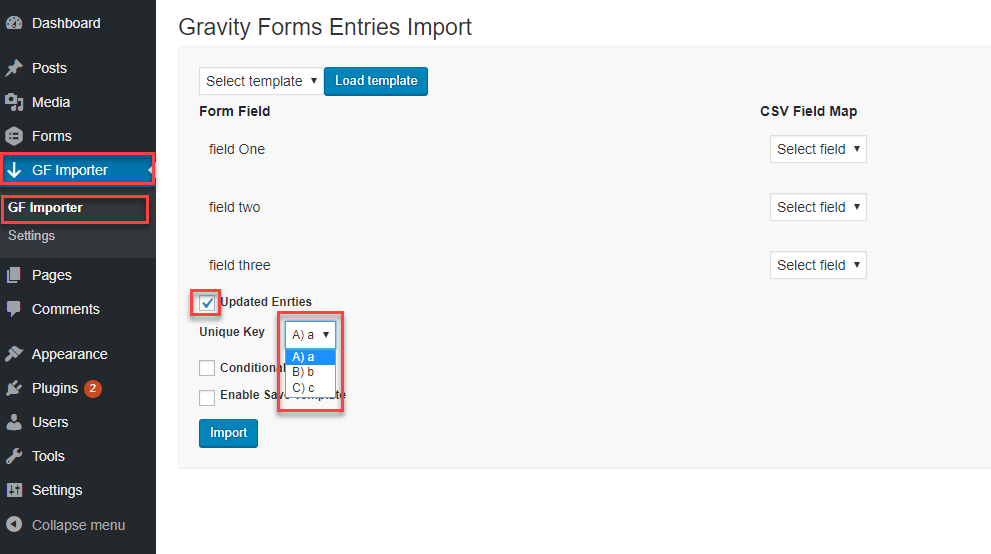
GF Importer: How to Update Entries
- To update entries, you need to check mark the “update entries” checkbox. Next, select the entries you want to upload by selecting your desired option on the drop-down list.
- Choosing an option in the drop-down menu means that that particular field is mapped according to an Entry ID, allowing the GF Importer to fetch records starting from this entry in the CSV file.
How to download import errors to a CSV file
If any of the records have errors or have caused problems while importing, don’t worry; The system will automatically add those records to a separate file.
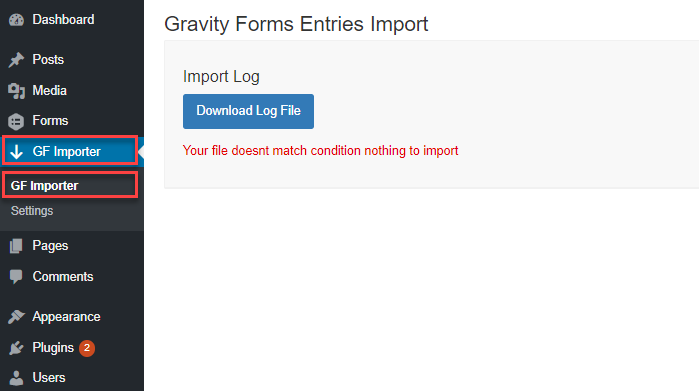
The admin can simply rectify the errors in the records and try importing them again.
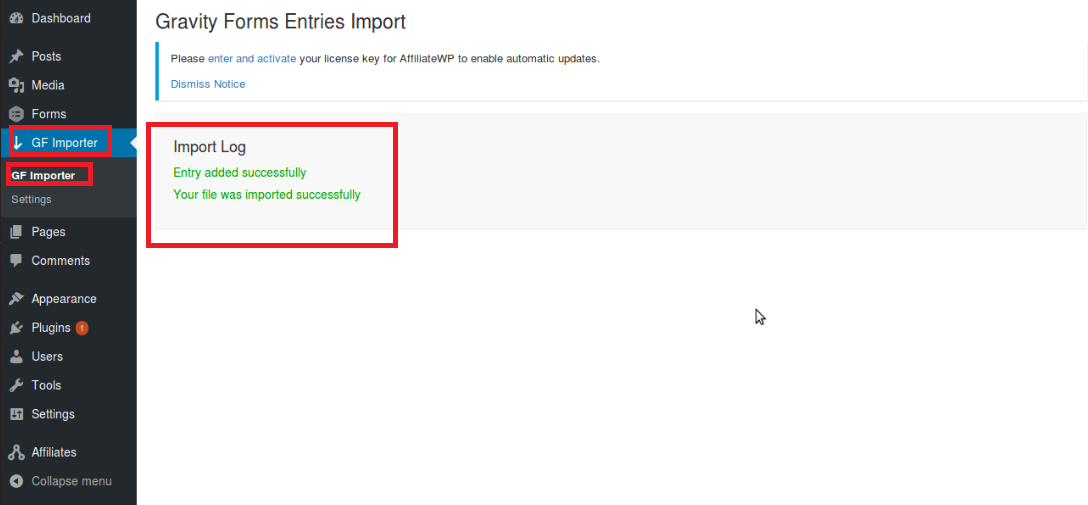
How to check the import status
Go to the GF Importer tab on the main menu and check the Import Log for the import status for each record.
How to configure the admin notification settings
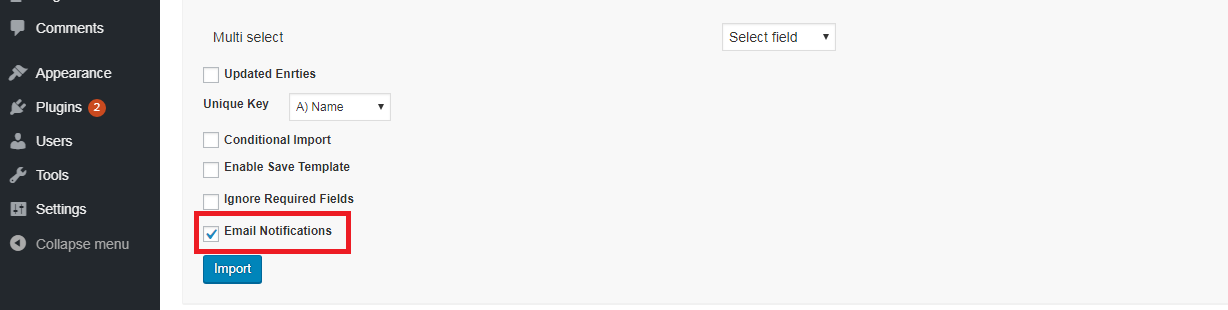
The admin has the choice of being notified by email for every imported entry. If allowed, the add-on will generate and send an email containing records of the entry to the admin.
- Mark check on the “Email Notification” checkbox to activate this option.
How to include/exclude the fields for import
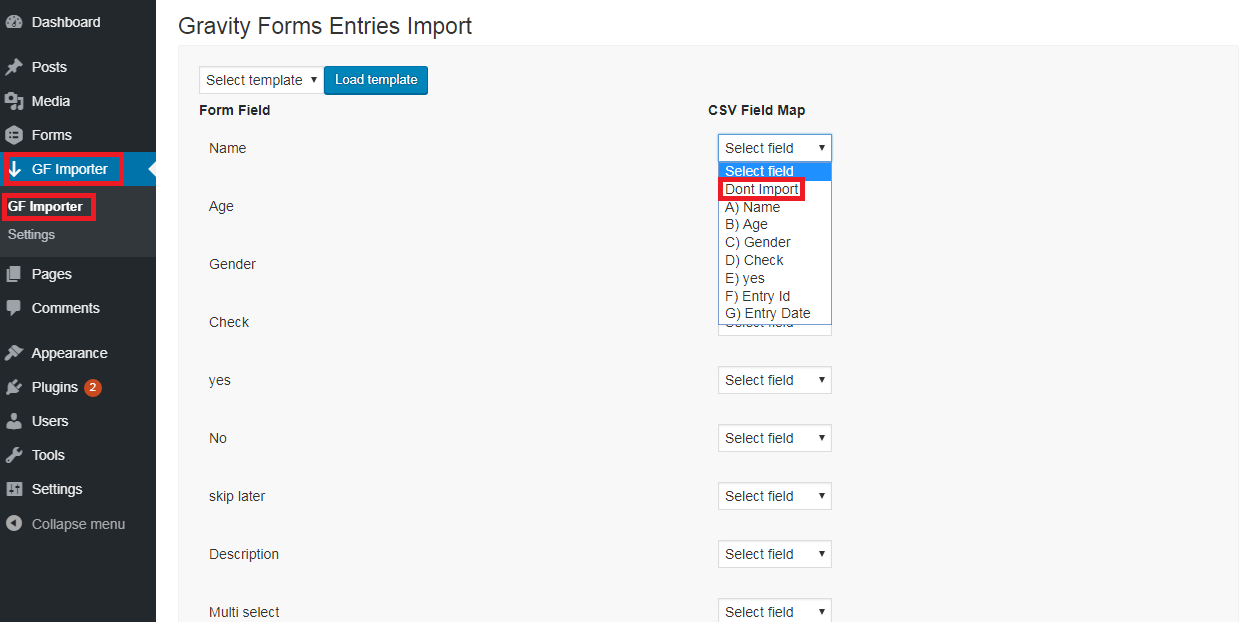
The admin has the option to determine which fields they can import – simply include or exclude the fields you want to import.
- This can be done via the “CSV Field Map” option in the drop-down menu.
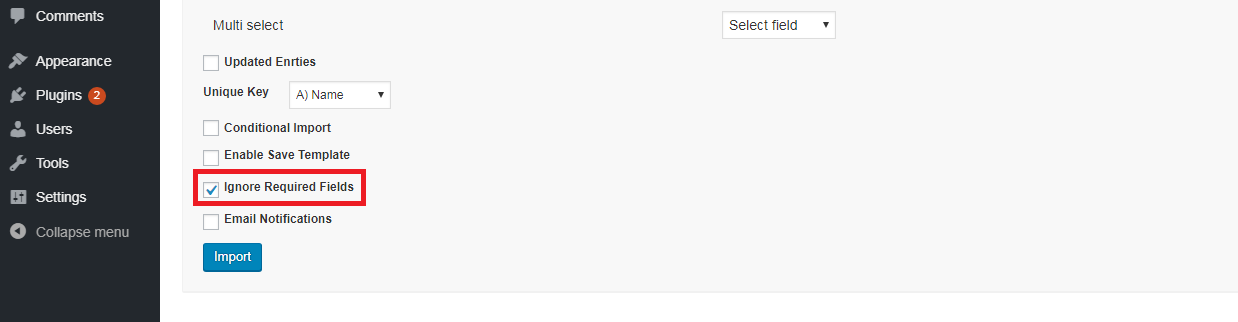
How to ignore required fields when importing
The add-on gives you the option to ignore certain required fields when importing. These import records will mark them as an empty entry.
- Check mark on the “Ignore required fields” checkbox (as shown in the screenshot.)
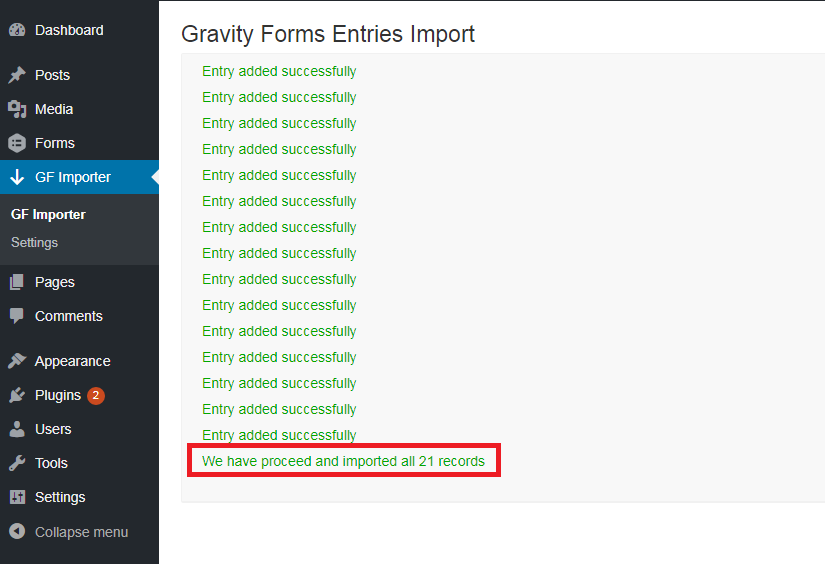
How to see the number of imported rows
Go to GF Importer, where you will see the number of records added at the end of the import status list.
COMPATIBILITY WITH OTHER ADDONS
Now, you can easily import digitally captured signatures, coupon details and survey data gathered through your Gravity Forms. Just map the fields and view your entries in the entries section of your form.
IMPORT CAPTURED DIGITAL SIGNATURES
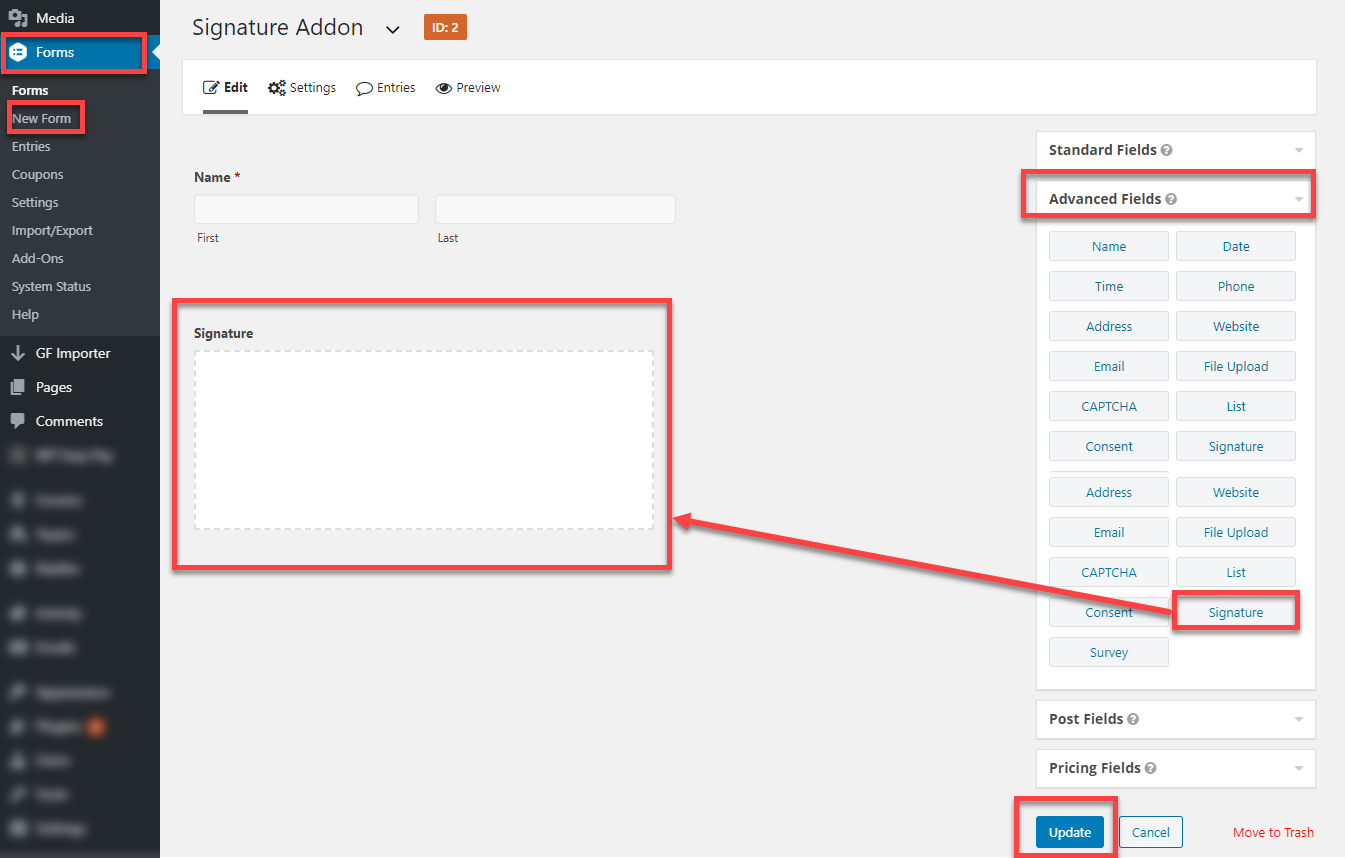
Gravity Form Signature Addon is required for importing digital signature entries.
- Download and Activate Gravity Forms Signature Addon
- Go to > Forms > Add New
- Navigate to the Advanced Field section and Add the Signature field option onto the form.
- Click on the “Update” button.
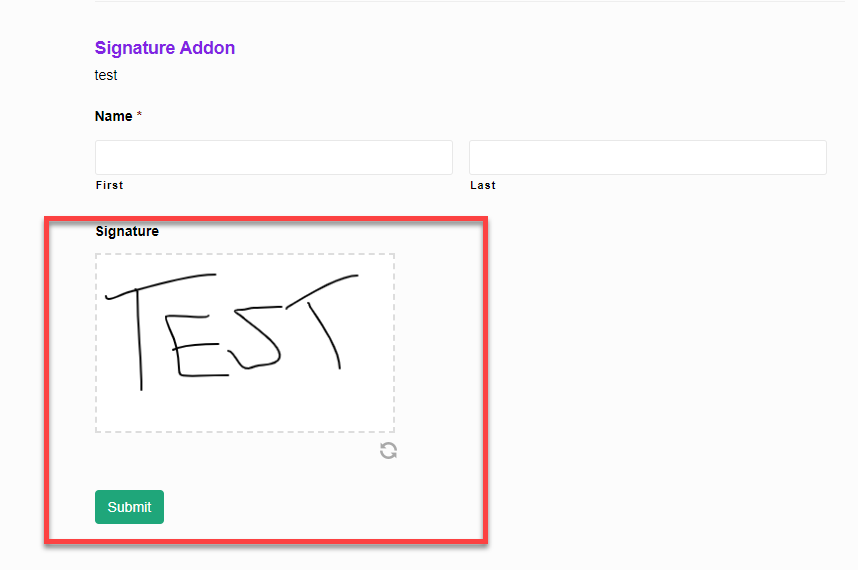
Front-End Signature Field View
GF Importer
- Go to > GF Importer
- Choose the file you want to upload and then select “Signature Addon” to import entries.
- Click on the “Upload” button.
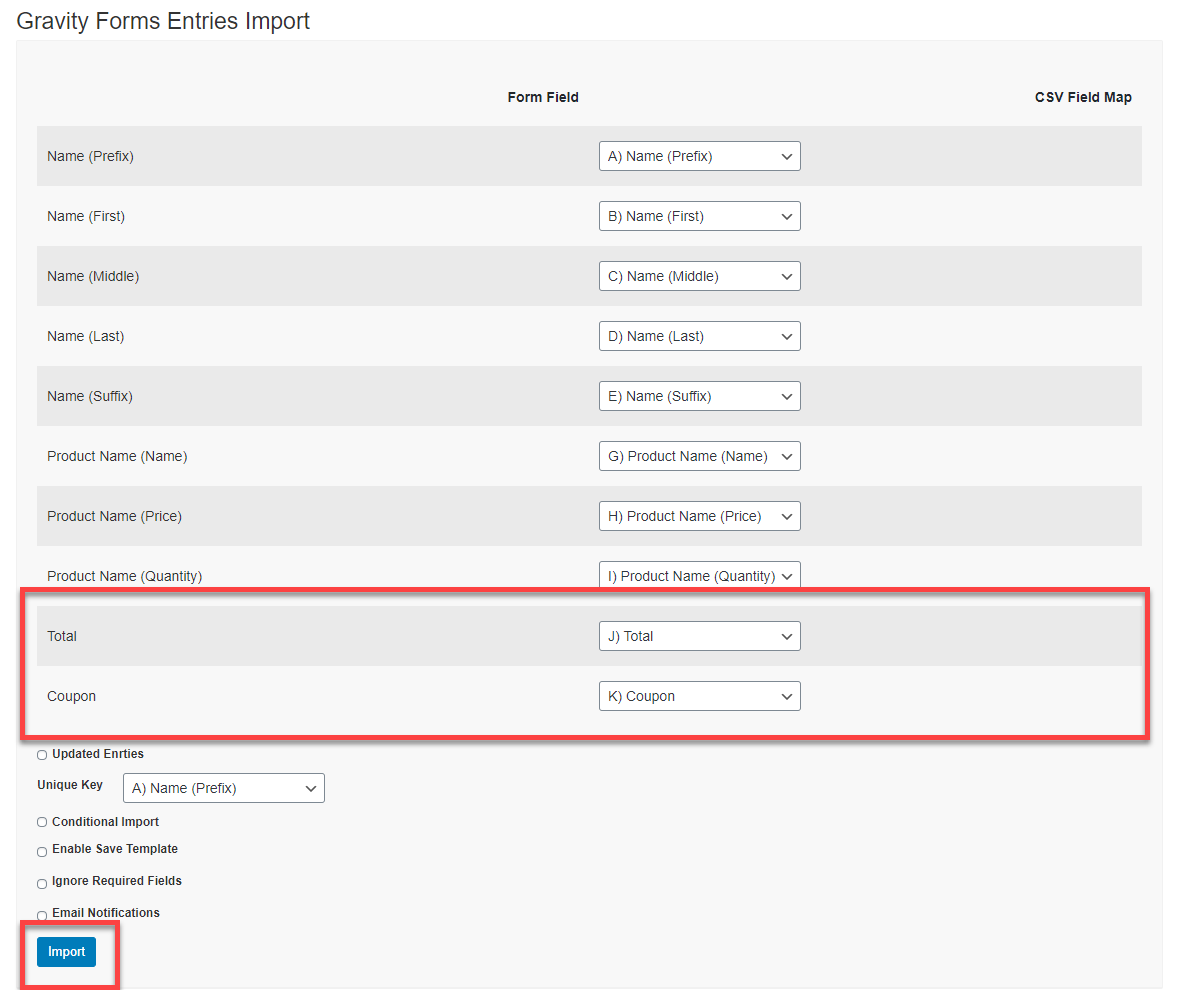
- Map CSV file fields against the Form’s field label names.
- Map the desired signature field against the signature label name.
- Click the “Import” button.
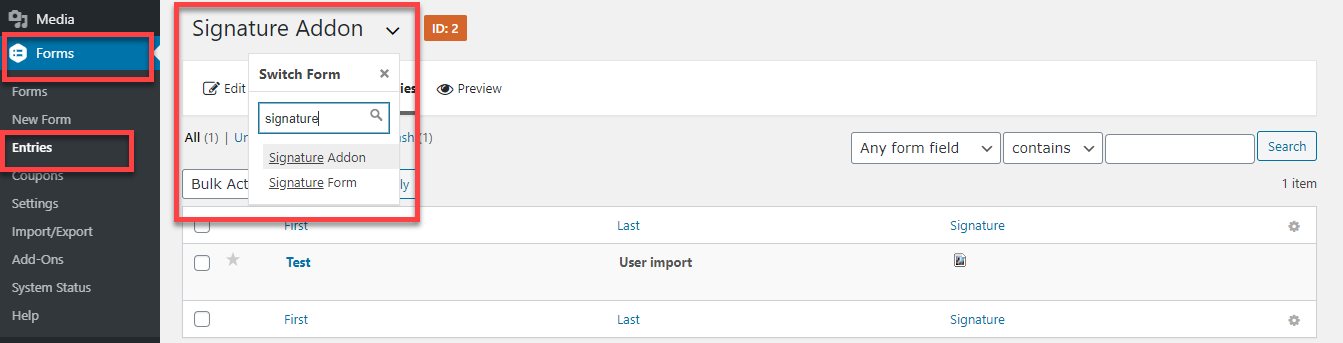
- Go to > Forms > Entries
- Select Form from the dropdown menu
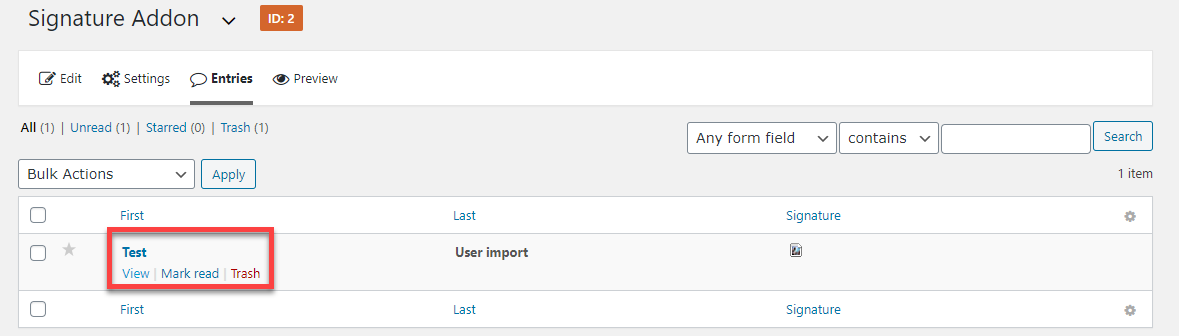
- View imported entries
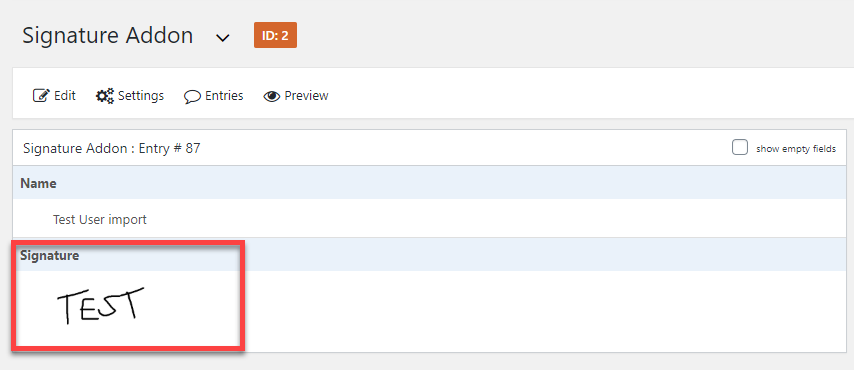
- Find Signature image inside
ACCESSING THE PLUGIN
To access the plugin admin has to access it from the dashboard panel menu, and click the GF Importer tab. In the GF importer tab, admin can access settings and see two text boxes, each having different functionality as defined below.
IMPORT SURVEYS
Gravity Form Survey addon is required to import survey entries.- Download & Activate the Gravity Form Survey Addon
- Go to > Forms > Add New
- Navigate to the Advanced Field section and Add the Survey field option onto the form
- Click on the “Update” button
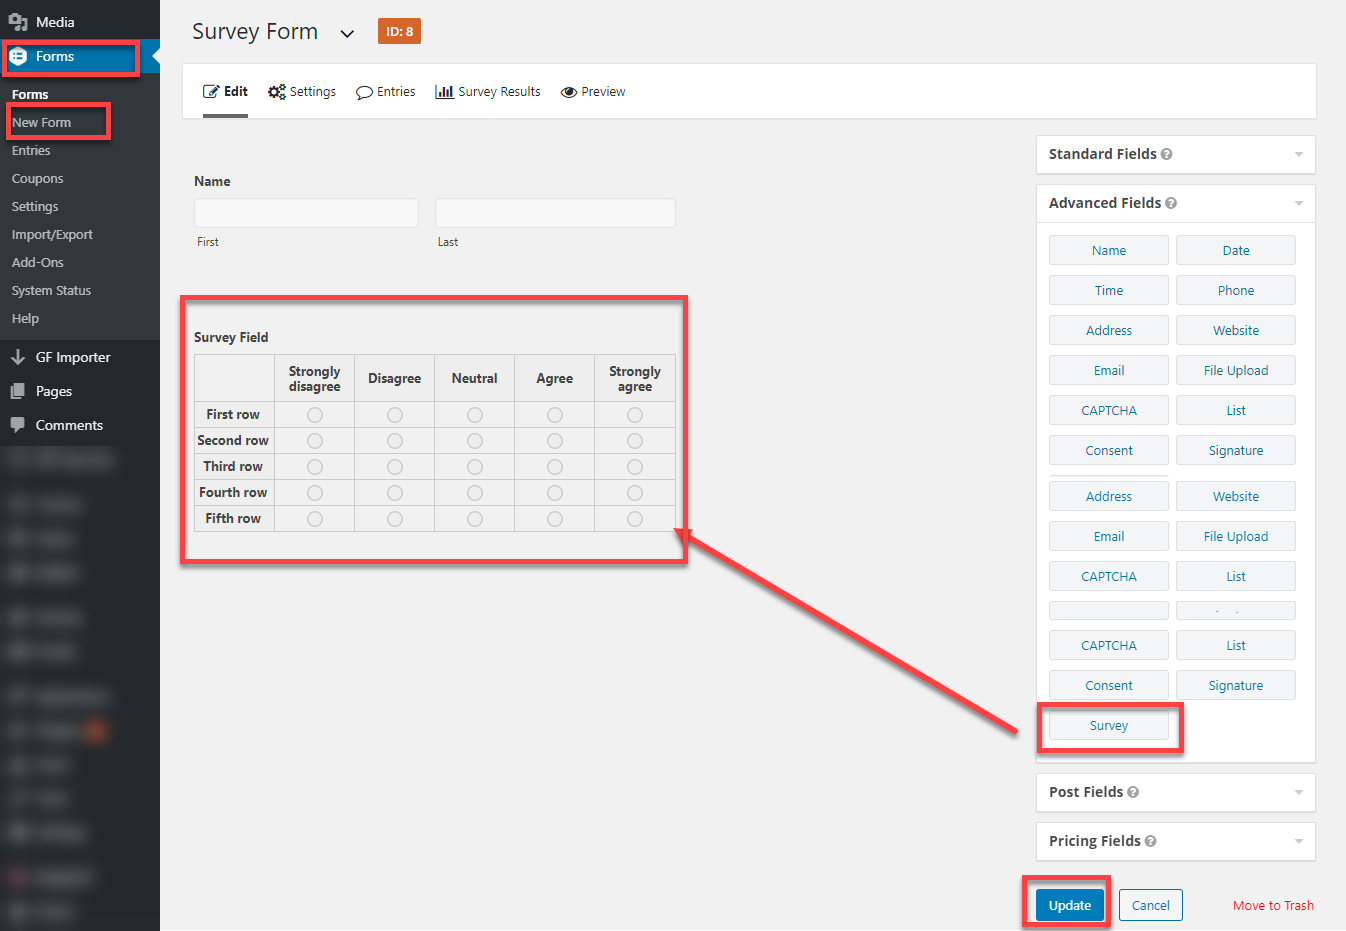
Front-End Survey Field View
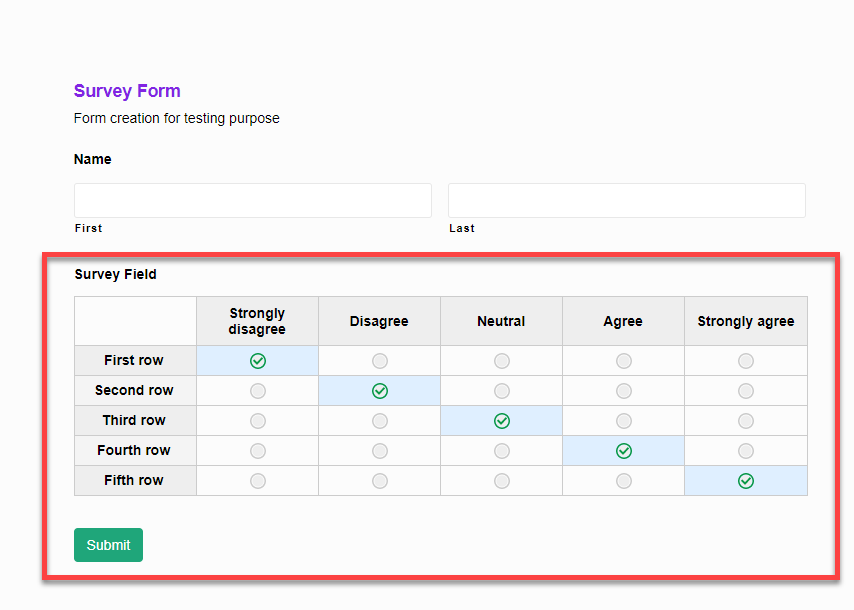
GF Importer
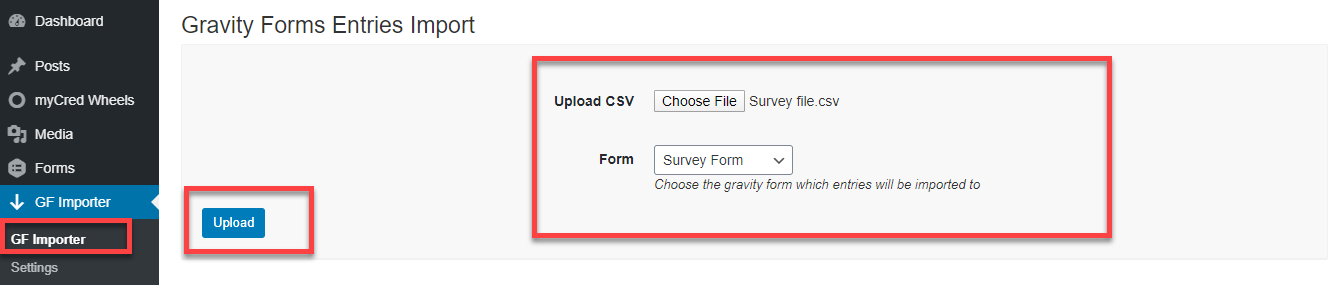
- Go to > GF Importer
- Choose the file you want to upload and then select “Survey Form” to import entries.
- Click on the “Upload” button.
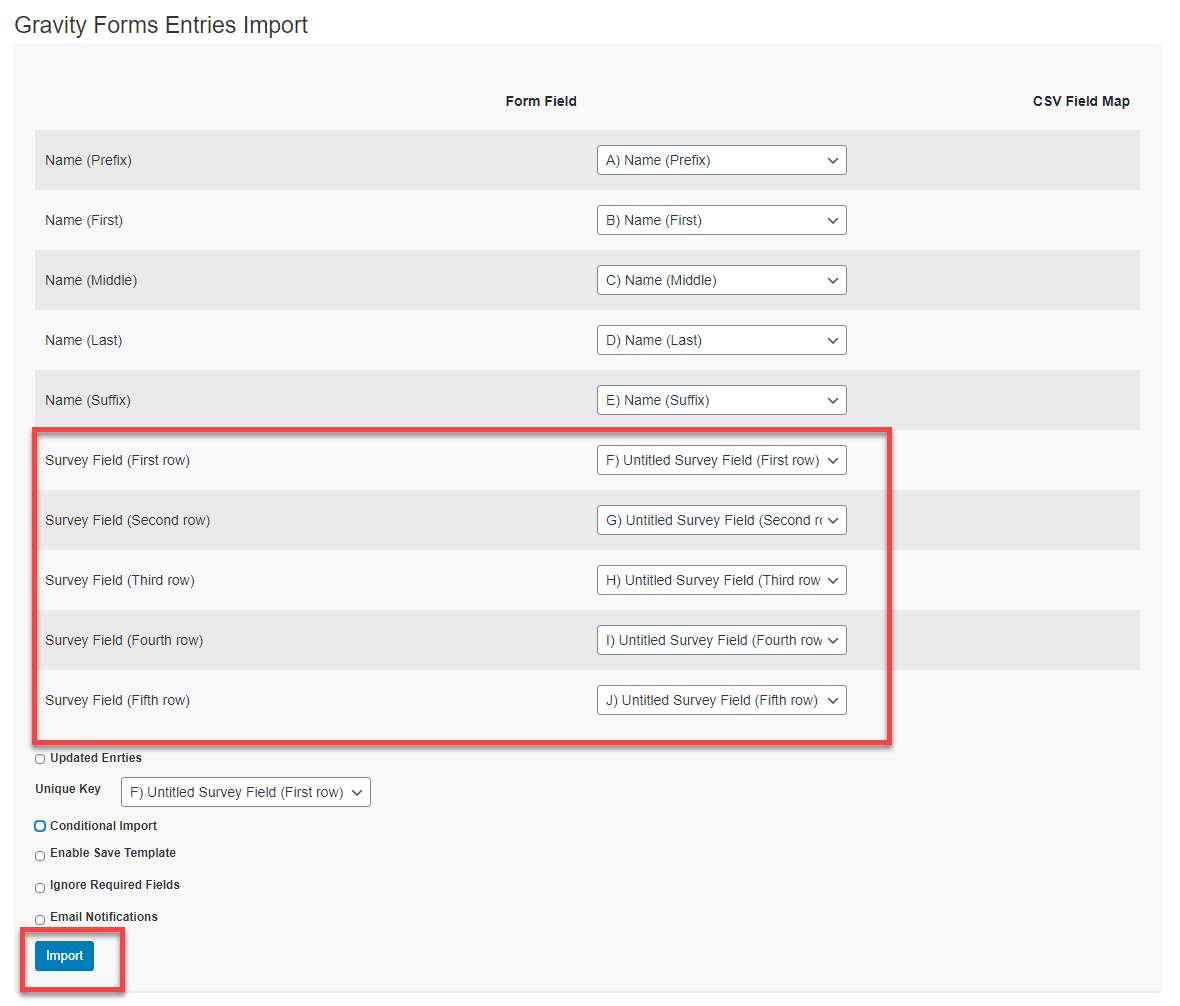
- Map CSV file fields against the Form’s field label names.
- Map the CSV File survey field against the Survey label name.
- Click the “Import” button.
Make sure survey fields are mapped correctly in order to avoid any misrepresentation of the data when importing entries.
- Go to > Forms > Entries
- Select Form from the dropdown menu
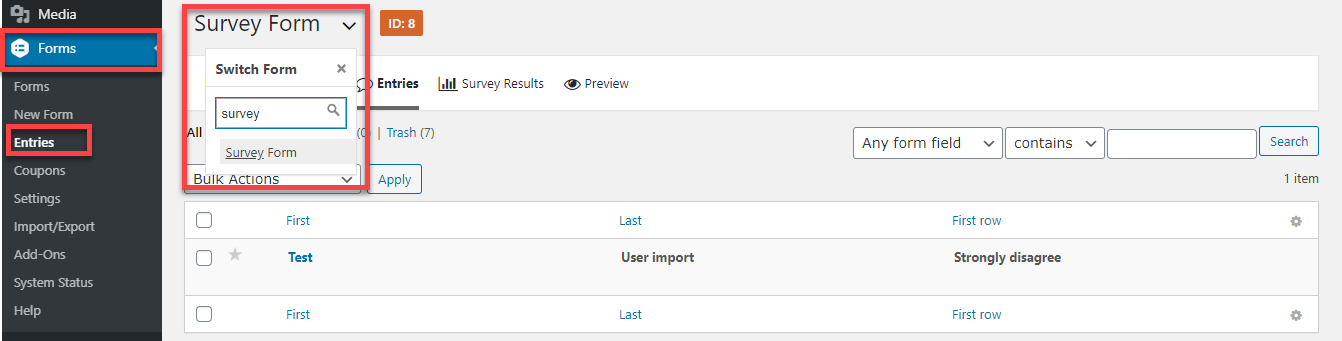
- View imported entries
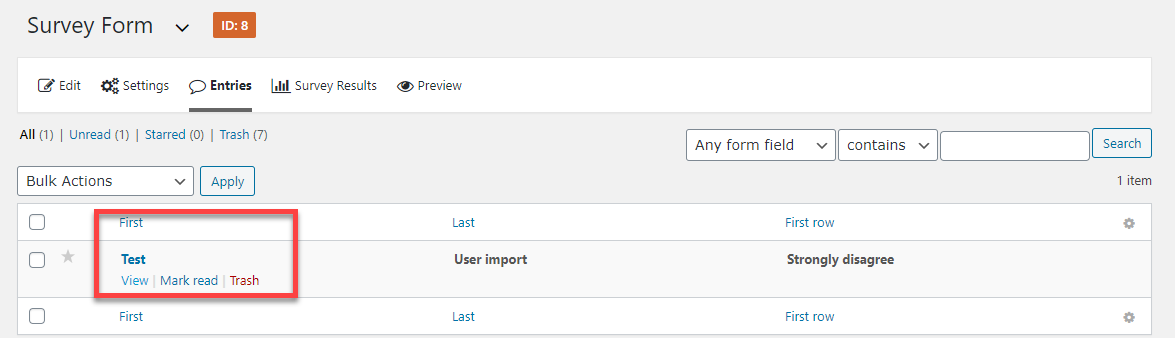
- Find Survey results inside
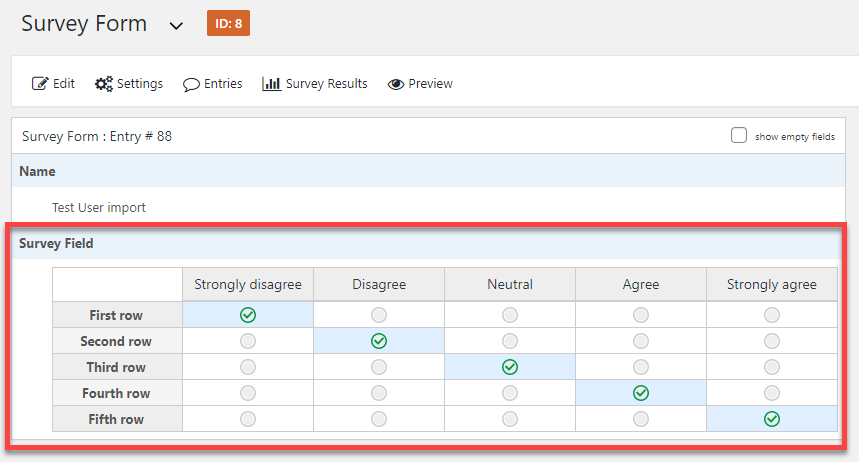
IMPORT COUPONS
The Gravity Form Coupon addon is required to import product coupon entries.
- Download & Activate the Gravity Form Coupon Addon
- Go to > Coupon > Add New
- Create a Coupon
- Go to > Forms > Add New
- Add the Product, Total & Coupon fields into the form
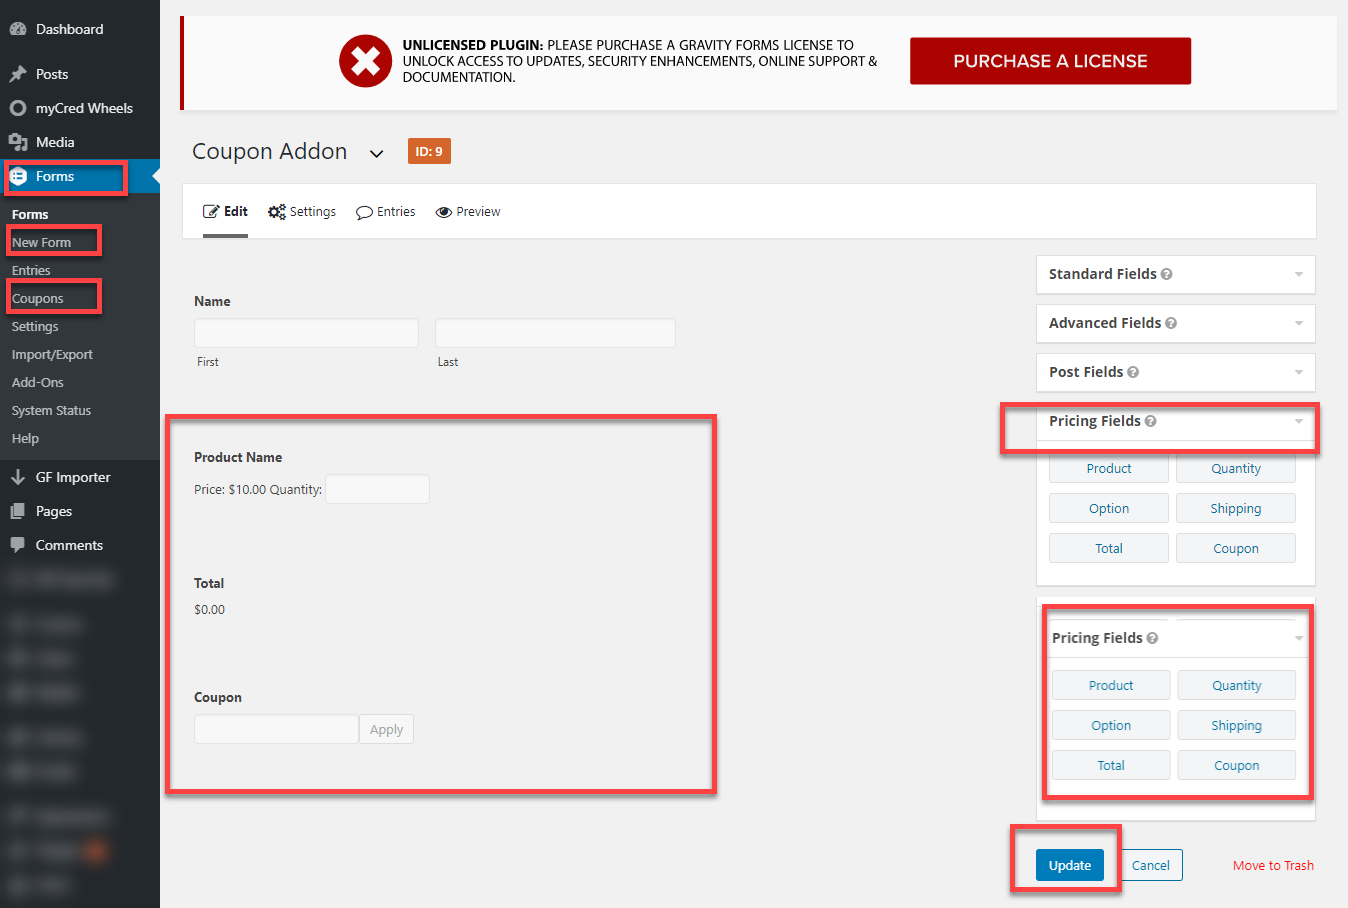
Front-End Coupon Field View
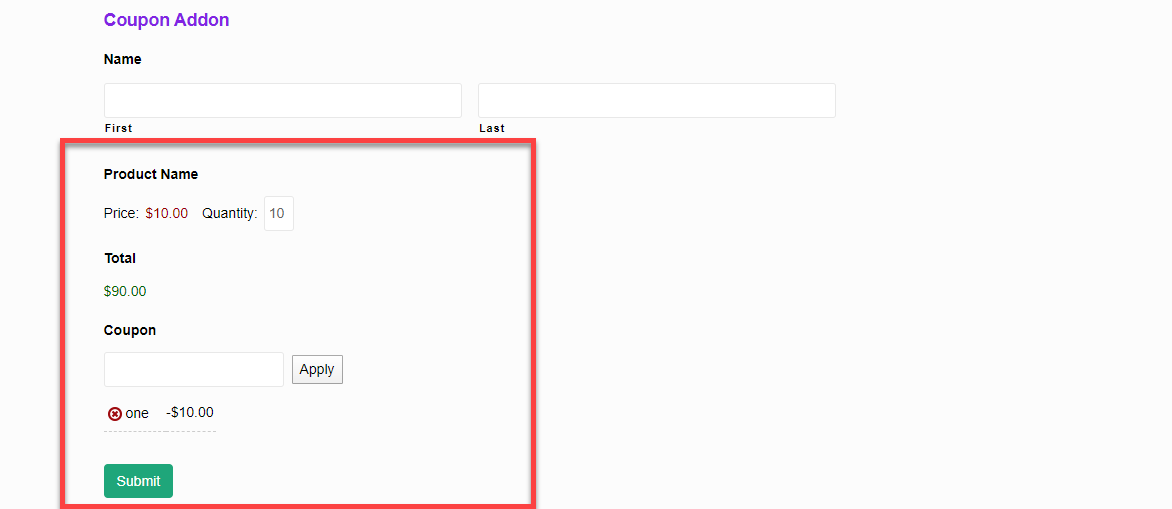
GF Importer
- Go to > GF Importer
- Choose file to upload select form to import entries.
- Click on the “Upload” button.
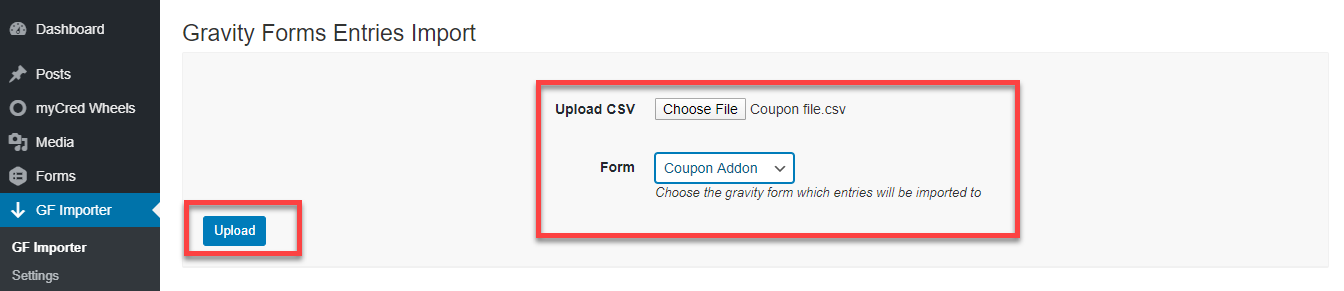
- Map the CSV file fields against the Form’s fields
- Map Product, Total & Coupon CSV fields against Form Fields
- Click the “Import” button.
- Go to > Forms > Entries
- Select Form from the dropdown menu
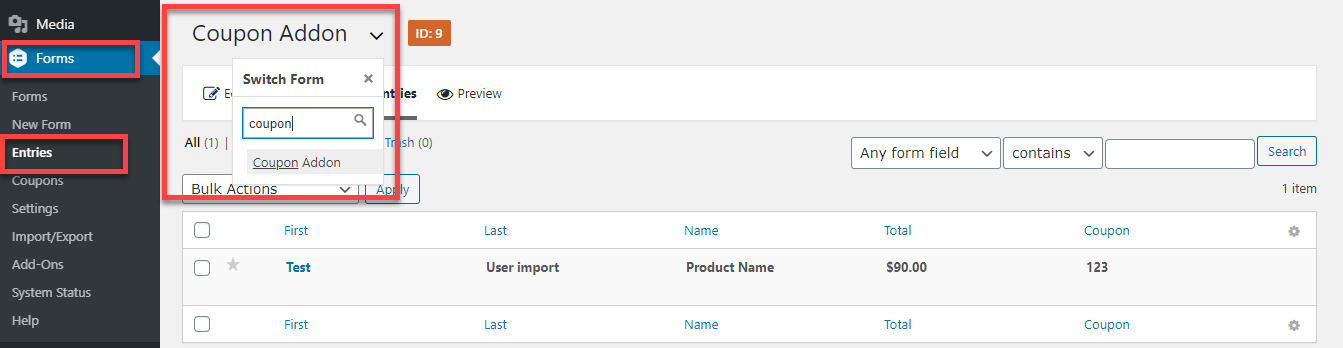
- View imported entries
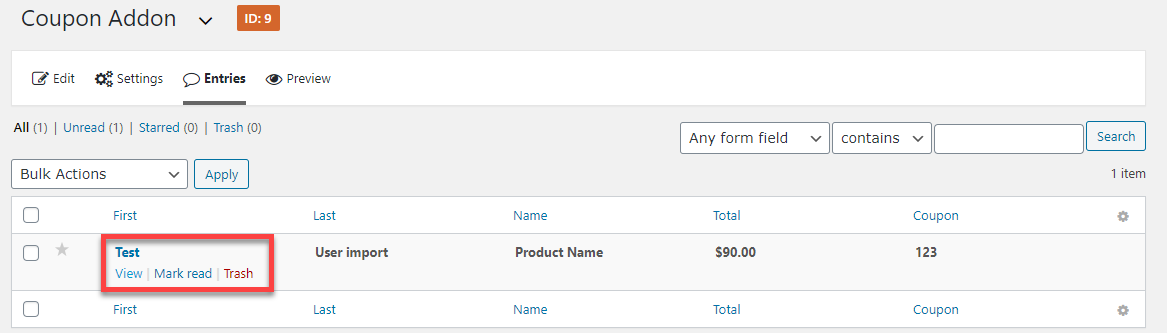
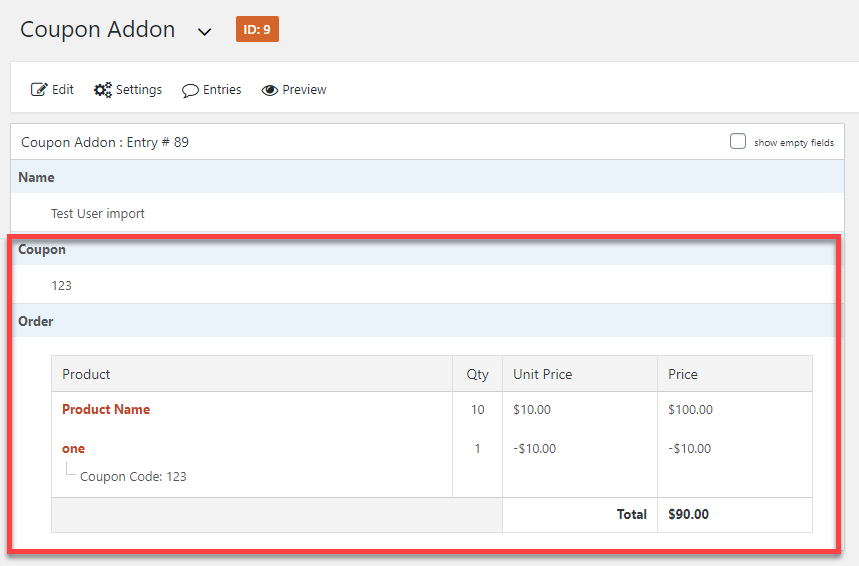
- Find Coupon results inside

LINKS TO SOME MORE GRAVITY FORMS INTEGRATIONS
- WorldPay with Gravity Forms
- Gravity Forms Smart Uploads
- Gravity Forms Address Google Autocomplete
- Gravity Forms Google Spreadsheet Add on
- Payeezy with Gravity Forms
- Pay with Square in Gravity Forms
- Gravity Forms Restrict Dates Add on
- Gravity Forms Preview Add on
Changelog
Version 1.3.3
Date:  07 April 2022
- Code improvement
- Tested with WordPress 5.9+
Version 1.3.1
* Added option to skip CSV Validation. This will provide a way to bypass 'You should upload CSV file' error.
* Removed extra options for updated entries field.
Version 1.3
Date:  28 October 2020
* Added option for remove template
* Added Custom capability to the plugin
*  Added 3 filters which enable us to map and import custom meta fields
*  Fixed Entry date importing glitch.
Version 1.2.3
Date: 4 June 2020
* Added Multisite Support
Version 1.2.2
Date: 26 March 2020
* Add Gravity Forms Quiz Add-On support
* Add Gravity Forms Polls Add-On support
Version 1.2.1
Date: 17 January 2020
* Add Freemius Integration
Version: 1.2.0
Date: 16 January 2020
* Add Gravity Forms Survey Add-On support
* Add Gravity Forms Coupons Add-On support
* Add Gravity Forms Signature Add-On support
* Fix update entry issue with unique column value not represent entry id
Version: 1.1.1
Date: 19 December 2019
* Added option to import entries in reverse
Version: 1.1
Date:  5 September 19
* Added Don’t import some fields in mapping to skip the field
* Added Email Notifications to send email with each record entry
* Added Ignore Required Form Fields to ignore the required validation
* Added Report after importing showing more details for the imported process
Version: 1.0
Date:  16 July 19
* intial release.
Categories
External listing. code.market does not sell this product and does not process payment for it. Pricing, payment, delivery, licensing, refunds, and support are handled by the third-party merchant on its own website. We may earn an affiliate commission from a referral. Details.
Products of the Week.
Submit🥇

wanapi.app
Wan API is a developer platform for the Wan video model family. Compare Wan 3.0, Prime and Pro specifications and prices, then prepare a request in the preview playground.
Other · 3,963 views · 9 clicksOther · Week 42 · 3,963 views · 9 clicks
🥈

wanapi.ai
Wan API is a developer platform for the Wan video model family. Compare Wan 3.0, Prime and Pro specifications and prices, then prepare a request in the preview playground.
Other · 3,738 views · 8 clicksOther · Week 42 · 3,738 views · 8 clicks
🥉

yee.site
Your link in bio, but a real website. Start from beautiful templates and ready-made sections, then add a shop, bookings, a blog and as many pages as you need. Perfect for your link in bio, portfolio or personal site.
Other · 9,657 views · 14 clicksOther · Week 42 · 9,657 views · 14 clicks
#4

upvote.club
Free Social Media Engagement that Helps Boost Your Content. Upvote Club supports 19 social networks with 100+ engagement actions in one dashboard. Add links to your posts and get free engagement from real users.
SaaS · 30,552 views · 102 clicksSaaS · Week 42 · 30,552 views · 102 clicks
#5

Seenshot App
Free, Fast, MacOS Screenshot app. Make Screenshot cmd+shift+2 and send it via link
Desktop App · 19,075 views · 112 clicksDesktop App · Week 42 · 19,075 views · 112 clicks
#6

Conversational Backlinks for Busy Founders
Place Backlink Relevant Conversation for your domain across Forums and Conversations
Website · 30,857 views · 202 clicksWebsite · Week 42 · 30,857 views · 202 clicks
#7

Substack Posting API
Onboard your Agent to Substack. Write Publish on Substack via API
SaaS · 49,799 views · 188 clicksSaaS · Week 42 · 49,799 views · 188 clicks
#8

codester.com
SocialDesk+: Omnichannel Social Commerce & Business Management Platform This is stronger than simply “Social Commerce and Messaging” because it tells buyers this is a complete business platform, not just a messaging script. Turn Social Conversations Into Sales SocialDesk+ is a complete omnichannel social commerce and business management platform built for businesses that sell and communicate with customers through social media. Instead of switching between WhatsApp, Facebook, Instagram and TikTok, businesses can manage customer conversations, comments, products, leads, follow-ups, automation, teams and business reports from one professional workspace. And because the full source code is included, developers, agencies and entrepreneurs can customize, rebrand and launch SocialDesk+ as their own business solution or SaaS platform. 🚀 Build Your Own Social Commerce Business SocialDesk+ gives you the foundation to launch: - Your own SaaS platform - A white-label social CRM - A social-commerce management system - A customer communication platform - A business messaging solution - A custom solution for clients - A multi-business subscription platform 💬 Connect Your Customers Supported social channels include: WhatsApp • Facebook • Instagram • TikTok Bring supported conversations into one centralized workspace and help businesses respond faster without constantly switching between platforms. 🛍️ More Than a Messaging Platform SocialDesk+ combines communication with the tools businesses need to manage customer opportunities: Inbox Manage customer conversations from connected channels. Comments Monitor and respond to social-media comments. Customers & Leads Organize customer information and potential buyers. Products & Catalog Manage products and give your team quick access to product information. Follow-Ups Make sure potential customers don't get forgotten. Automation Automate repetitive customer questions and responses. AI Assistant Provide AI-assisted communication when configured. Team Management Give managers and staff access to the business workspace. Reports & Analytics Track activity using business reports and analytics. The current product listing already includes these capabilities. 🔥 Why Buyers Will Want It Launch Faster Start with an already-built business platform instead of developing the entire system from zero. Customize Everything The full source code is included, allowing developers to change branding, features, workflows and integrations. Build a SaaS Create multiple business workspaces and offer SocialDesk+ as a subscription-based service. Sell to Businesses Offer it to retailers, restaurants, service businesses, online sellers, agencies and other businesses that communicate with customers through social media. Mobile + Web + Backend This isn't just a mobile UI template. It includes: - Flutter mobile application - Python / FastAPI backend - Web interface - Administration tools - Database infrastructure - API-based architecture - SQLite / PostgreSQL support - Android and iOS project structure 💼 One Platform. Multiple Business Opportunities. For SaaS Entrepreneurs Launch your own subscription platform and allow multiple businesses to operate inside separate workspaces. For Software Agencies Customize and rebrand the platform for clients instead of building an omnichannel business system from scratch. For Developers Use the complete source code as a foundation for your own social-commerce or customer-management product. For Businesses Deploy a dedicated version for your own customer-service and social-commerce operations. 🧩 What's Included Mobile - Flutter / Dart - Android - iOS project Backend - Python - FastAPI - SQLAlchemy - Alembic Database - SQLite - PostgreSQL Web - HTML5 - CSS3 - JavaScript Deployment - Docker - Docker Compose - Production configuration Business Platform - Multi-workspace architecture - Authentication - Teams - Customers - Products - Messaging - Comments - Automation - Reports - Subscriptions - Administration The current listing also documents third-party integrations such as Meta, TikTok, Stripe, Firebase, SMTP and optional OpenAI configuration. ⚡ What Makes SocialDesk+ Different? You're not buying a simple: ❌ Chat UI ❌ WhatsApp clone ❌ Flutter template ❌ Admin dashboard ❌ Basic CRM You're getting a complete business platform foundation that can be customized, branded and commercialized. Connect. Automate. Manage. Grow. SocialDesk+ Omnichannel Social Commerce & Business Management Platform One important change I'd make to the current listing The current page starts with: “A simple guide to managing your social conversations, customers, products and business activity.”
Other · 17,199 views · 33 clicksOther · Week 42 · 17,199 views · 33 clicks
#9

sandbook.app
Sandbook reads EPUB, PDF, web pages and scanned pages aloud with Kokoro TTS, an open neural voice model that runs on your iPhone, free and offline. Choose from 41 natural voices in English, Spanish, French, Italian, Brazilian Portuguese and Hindi and follow each word as it is spoken. Try the same voices in your browser first with the free Kokoro TTS online demo.
Other · 17,153 views · 15 clicksOther · Week 42 · 17,153 views · 15 clicks